Posts

Showing posts from April, 2011

New Solo Ave Speed Record - 80km West Loop

Previous record was achieved in Feb (31.1km/h) and that was with some help drafting a fast group at Jalan Buroh. Today, I hit 31.6km/h over the same distance. No help this time, in fact, helped a small group vs. headwinds at Nicoll Highway. Initial plan was to get back by 8am (set off at 5.10am) which is normally not an issue but I wanted to hit ave of 30km/h as early as possible. Managed to hit that goal at Neo Tiew (~35km) despite numerous lights from the start, there was a lot of stop and go and the lights but I persevered. HR was higher than normal due to this. Stopped to say hi to Mark at Mandai Shell. He was waiting with group for the rest to bunch up. It was tough up till Neo Tiew and LCK but it got a lot easier after that. After Jalan Buroh, ave was about 31.2km/h and post west coast viaduct, it was 31.8km/h. It started to drizzle a but at the viaduct but fortunately, skies were clearer down east. Tough to maintain the ave speed achieved as a lot of stoppages at Shenton Way. Go

JMFR 2011 (Janamanjung Friendship Ride)

So the crazy guys are up to it again this year, driving 500km+ up north for a bike ride and back again! This year we stayed at the same hotel (still looks to be one of the better ones in town...) but explored a bit more by patronizing a different massage shop and eating area. The ride this year is FLAT. I do distinctly remember one slope though, where I raced up with Ben hot on my rear wheels (I got a shock when I saw him right behind.....he's sprinting up slopes now!). Other than that it was very nice, well controlled ride. I was mostly in the front group (trying not to get dropped ala last year) and the speed was regulated by a Police Proton Saga and a couple of Honda VFRs and Cubs. Speed was at a good pace, mostly about 35-37km/h. I got some really good training in peloton riding from this ride! We did not go as a group but Ben and me were mostly together while BP and Mark as another another pair. The ride started, as last year, at the Stesen Janakuasa Sultan Azlan Shah. Weathe

Weekend before JMFR 2011

Did the same 115km route on Saturday. Luckily no dramas. Started out with no pressure, just to be "back by 9am"....actually that is quite a pressure in itself already! This ride had particularly more headwind and neutral conditions that previous rides. Felt ok at Punggol but can feel steadily draining out at Pasir Ris. At coastal I caught up with a joyrider tri-bike equipped with powertap. He saw me sticking to his wheel and steadily increase his speed to about 40km/h at the straight until he motioned me to pass and I did, but I signal to him stick to my wheel as well. Led at 40-42km/h, slight headwind then he took over again. All in all, pretty decent speedy run at the straight considering I've already gone through 100+km solo. On this ride, I wore my new Mavic shorts (a bit too large at XL but works ok) and had one new GU Vanilla Bean flavour. The shorts are very good, and Vanilla taste is not bad as well! Thank goodness, no drama on this ride (no punctures!). Had a nic

Nook Color : From E-Reader to Gingerbread Tablet!

Ok by no means I did this at all, I'm just putting this line by line instructions for the benefit of thos e interested in hacking their Nooks and there are many of such ones available online. This is a tabulation of what worked for me (after 2 Nooks). I think its quite intimidating in the beginning (prospect of 'bricking' the nook!) but I thinks is 95% safe! good enough for me! So Kudos and Many many thanks to those people who did those links I'm about to list below in my brief steps. You guys are android gods as far as I'm concerned. START Ok, the NC is basically an E-Reader...but its built on top of Android 2.1 (that is until 2.2 version comes out) which is probably good enough for a lot of things but does support a lot of the new stuff available to newer versions Android such as faster speeds and flash support. Before we can do anything with the NC, we need to ROOT it. Meaning get to its roots and gain control of the device...that's right get below the B&

I, Jackal, Android Device Hacker

Image
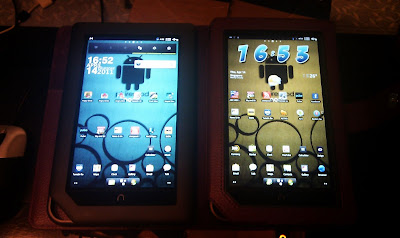
Yes its official and addictive. Over the past month I've been toying around with Barnes & Noble's Nook Color E-reader....it really a tablet running android OS! There's so much info one can get on the net on how to hack this baby and load it up with Froyo, Gingerbread and even HoneyComb versions of Android. What more...it can be overclocked! Open source is amazing.....bye Apple! This is an amazing device....and I got it for about SGD350 shipped from the US B&N website to my VPOST acct. Granted it does not have camera or GPS but hey who needs em when you have a screen that is higher resolution than the Ipad?? for like half the price? and after hacking you can have all the goodies like Flash support on browsers...tons of free stuff available from the android market as well. Getting into the hacking community for Android is also pretty addictive....I bought another Nook for my Sis as a present for her birthday and have just hacked it with Phiremod 5.3 (based on Cyanogen

The Jackal's first Tubular repair

Image
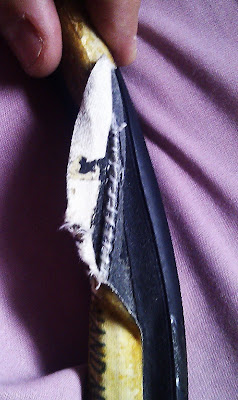
Managed to squeeze some time in the afternoon to do this....couple of steps involved. 1. Find the Leak To find the leak, first inflate the tires up and slowly rotate it into a small bucket of water. In my case I it was a pinhole puncture at the tire itself. I marked it up and wipe the tire dry. 2. Opening up the Sucker Now I'm not sure why it seems so easy in those videos and forums but I found this a bitch to do! The toughest part by far is the removal of the mounting strip (which cover the stitches). It must have taken me like 15mins just to open up just enough for me to slit the stitches. From where I marked, I must have opened 1.5 inch in length. Remove the threads around the intended area. 3. Disemboweling the Tubular Ok, now pull out the tube from the hole just made. I was inspecting the latex tube for a hole but could not find any...so I pumped it up a little and placed the tube in the tub of water to locate the leak. It was a really tiny pin hole! I marked it. 4. Patch it

115km Saturday & 76km Sunday + One more puncture

On Saturday, I repeated the same ride from last weekend and hope that this time it won't rain. Well the heavens heard me. It didn't. However, it did not make me any faster....fatigue perhaps or the bad headwinds from Pasir Ris onwards? Anyway, it was tough enough for me just to try to attain >30km/h doing this route solo. At Changi coastal/CV, I cooperated with 2 rather strong malay rider (in Zipp uniform), they were kind enough to allow me to. They were training or some sort I think...going 37-38km/h into direct headwind. Together, we did well in maintaining the speed above 38km/h. I was spent upon reaching home. Luckily this time I did not have a post-cyclocross situation with my bike. Ah yes guess what? Front tire puncture at ECP! It did not give way but gradually when I felt the front wheel was making some weird noises (later to find out its the rim hitting the road when the tire bottomed out, though it was not completely out of air). I managed to get home safely, no iss

The Jackal's Tubular First Installation

Image
Uncharted territory but no worries, I saw some Youtube videos on this I'm thinking 'no problem'. Here's a brief step by step of that I did and what I used. Ingredients :- 1 pcs tubular tire one tireless rim (carbon) small plastic bag 1 tube Zefal Tubasti glue (can use other types of course!) steady hands newspaper Directions :- its a good idea that before you start out, place some newspaper to cover that nice floor of yours you will need to apply the glue using your finger (more control), to do so, its prudent to use the plastic bag as a finger condom! :) apply glue on the rim bed uniformly, a thin layer will do! I made a big mistake by applying too liberally!! make sure the sides of the bed have glue as well as this is the critical contact point with the tire once that is done, start on the tire...apply glue with your protected finger, again a thin layer will do on the fabric part of the tubulars this is the most important part - waiting for it to dry out till its just

115km Solo in the Rain and with a Puncture

I did not get to cycle long distance last weekend due to my return home to Ipoh for Ching Ming so this ride was more like 'make up for lost time' ride. I was looking forward to this all week and knew no one would come with me and I did not bother to ask.... Had an early start around 5.10am and the skies looked grey (even at night!) but I said hey, maybe it would rain but likely only for a while or in certain stretches...still good to go and so I did. All was good until I hit the Esplanade when it suddenly started to pour...I could see a blanket of rain approaching me at the opposite direction. Got hit a bit and found shelter at the bus stop right outside the Esplanade...waited for about 10mins before it look subsided and I went off again in the 'medium' drizzle. As soon as I hit the via duct at West Coast Highway, it again poured! I just told myself to go on, no point to stop now, just need to be more careful. After about 10mins in the rain, somewhere along Jalan Buroh,